|
Horse Ground Training Exercise, Hip-Shoulder-Shoulder
The Magical Exercise by Beth Esfandiari JL Horse Trainer
If someone told you that there was one simple ground exercise that could teach your horse: forward, back, collection, softness, stop,
proper self carriage, impulsion, rhythm, canter departs and more, would you be interested? If someone told you that this exercise
required no special equipment, had three steps and developed muscles on your horse you could only find on an iron man, would you
be skeptical? Of course you would. How many of us have tack sheds full of that one magic piece of equipment; closets full of once
viewed training tapes, stacks of stained and tattered horse magazines with dog eared training articles slipping from their staples? Probably all of us…you know who you are.
Well, ladies and gentleman, it exists and it is called Hip-Shoulder-Shoulder. I give full credit for the creation of this exercise to John
Lyons, my teacher and inspiration. If any of you horse folk out there feel you thought of this first and have been doing it for years, I
apologize for not throwing the kudos your way, and applaud you for loving your horse enough to use this valuable tool.
The beauty of this is its' simplicity. By repeating the steps in its' basic form (that is, with no thought beyond practicing each step for the
sake of each step) you will in a short time, have a horse that is stopping and backing better than you will have ever experienced before
. Take the next logical step in the exercise, and focus on your problem area. Go forward, for instance, and you will see benefits
outside of your riding goals, like trailer loading issues, entering wash rack foibles, and leading problems of all other sorts. Put a little
more practice time in, and suddenly your horse has a spectacular….uh….booty. Not to mention gaskin, stomach and shoulder
muscles. But here is the most amazing part of all! You can use this exercise to actually calm your horse down, get him out of a sticky
situation, turn a wreck into a controlled and beneficial series of movements (aka no one will know it’s a wreck). Imagine a ride, show
or lesson experience where you felt 100% in control 100% of the time! Ready to learn this now?
Lets start with general information. The name, Hip-Shoulder-Shoulder, well, that refers to the horse. You will be using his jaw to
influence these other parts. Now remember when I told you there was no special equipment needed? Well, I lied, but I am sure in your cobweb ridden tack sheds you will find all that you will need.
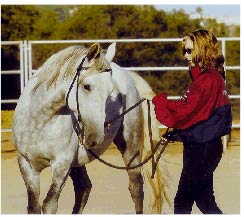
A nice full cheek snaffle, a cotton lead rope and a dressage whip ought to do the trick. Fit the snaffle to the horses bridle, attach the
lead rope on the left side of the bit, hold the whip in your right hand, stand by your horse’s left shoulder, facing your horse in kind of a longing position and lets begin.
The whip is your gas peddle. Use it only on your horse’s hip. Start with the least amount of pressure from the whip needed to get your
horse to walk forward continuously with out constant reminders from you. For a few of you that may mean lift it two centimeters off
the ground, and your horse will be galloping sideways. Once the horse is walking forward calmly with out dragging you or you
dragging him (remember this is not leading but driving from the hip and following) you would then take the slack out of the rein/lead
rope adding pressure to the left side of your horses mouth, causing him to do one of several things: stop, pull on you and keep walking
back up quickly with his mouth open, open his mouth and turn his head sideways while continuing to walk, or maybe run. The
answers are as varied as the horses we teach this to. Your focus will be on trying to get the horse to stop his forward momentum and
disengage his hip to the right by stepping his hind foot closest to you across in front of his other hind foot and then taking each of his
shoulders back one step. Then you release the rein and praise the horse lavishly. Got it?
I highly recommend you practicing without the horse first. Talk your way through the steps envisioning what it is you are asking for
from your horse physically. Meaning what part moves where, when, and how. You will look silly, try to do this in the privacy of your
living room or out behind the barn in the wee hours. Once you can get your hands and feet to work independently, while uttering the
mantra, “forward, good, slack out, hip over, foot in front of other foot, lines up feet behind front feet, good, shoulder back one step,
good, other shoulder back one step, release the rope/rein; .good boy!”
Then try it out on a human friend, a good friend, a friend you have some horrid little secret on. Don’t attach the bit to this friend.
Simply have him or her hold the rope in their hand at shoulder height, by bending their elbows so the wrist and hand is at their shoulder
. Proceed through the steps, while encouraging the volunteer to act out several horse-like scenarios as mentioned previously. Once
you feel you can stay focused on the lesson even when your friend is not following the steps as you are repeating them in your head
and you have the ability to deal with this by sticking to a certain part of the exercise until it falls into place, you are ready to add the
equine aspect to this. If you are confused at this point after reading all of this, remember that feeling. Your horse will feel the same
way you do now. The lesson is always clearer to the teacher than to the student.
Wise words from Mr. Lyons. If you get frustrated and angry with your horse just imagine me reaching through your computer screen
and smacking you a good one for not understanding me; ludicrous, I know. You wouldn’t like to be a student very long if your
teachers abused and berated you for not understanding their instruction, would you? Cut your horse the same slack, and remember “If he knew it he would do it” John Lyons.
The following is the anatomy of Hip-Shoulder-Shoulder on an average horse. One that is not afraid of a whip, does not pull
excessively on his bit etc. It may help to see its' evolution into the upper levels of the benefits from this exercise.
1) Horse moves off easily when whip is raised and walks calmly in a 20 meter circle with you(that means your feet are walking too)
2) You stop your feet and take the slack out of the rope and the horse stops its shoulders and hops its hind end around, then backs
up stiffly with its head straight out in front of it. You begin to practice at a trot.
3) As you practice you notice the horse no longer puts pressure on the rein as he backs up and the hip flows smoothly to the side
4) Now not only is there no pressure on the back up but you notice that your horses hindquarters are lowering during the back up
and during the forward he springs off of his hind end, instead of dragging himself forward with his shoulders.
5) Soon you notice that the horse is not putting any pressure on the bit as he circles around with you and his head is staying slightly inside the circle as you trot
6) You can actually pick up the rein at a stand still and he will glide smoothly backwards. Giving his jaw and lowering his hind quarters.
7) Once your horse has begun to back up instead of disengage on a regular basis you will notice the jaw raising the poll as your horse
backs up. Eventually the poll will affect the withers lifting the horse over its quarters.
8) All the horse’s takeoffs are off of his haunches, and he travels in a rhythmic, collected manner. No longer falling onto his forehand
as he transitions from stop to go. Or backing to go forward.
9) You are able to lengthen and shorten your horses stride within the exercise. By asking for more foot speed your horse springs into a collected canter in hand!
10) By shortening your horses stride you are ready to take your first steps of piaffe; it just keeps getting better from here.
|